Partner Integration Journey
A step-by-step walkthrough for SDK partners covering environments, authentication, SDK embedding, coins, theming, events, webhooks, and going live.
Part I - Prerequisites
This section covers the essentials you need before starting your SDK integration: environment URLs, credentials, and the SDK URL format.
1.1 Understand the Environments
Hubble provides two separate environments. You will start on Staging for development and testing, and move to Production after your integration is verified by the Hubble team.
| Environment | SDK Base URL | Purpose |
|---|---|---|
| Staging | https://sdk.dev.myhubble.money/ | Testing and development |
| Production | https://sdk.myhubble.money/ | Live users with real transactions |
1.2 Get Your Staging Credentials
Use the integration portal to obtain your:
- clientId — Your unique partner identifier
- appSecret — Your application secret (used in the SDK URL)
1.3 Understand the SDK URL Format
The Hubble SDK is a hosted web application. You embed it in your app by loading a URL. Every SDK URL follows this format:
https://sdk.dev.myhubble.money/?clientId=YOUR_CLIENT_ID&appSecret=YOUR_APP_SECRET&token=USER_SSO_TOKEN| Parameter | Description |
|---|---|
clientId | Your unique partner identifier, provided by Hubble |
appSecret | Your application secret, provided by Hubble |
token | A per-session SSO token that identifies the current user (see Part II - User Authentication) |
Part II - User Authentication
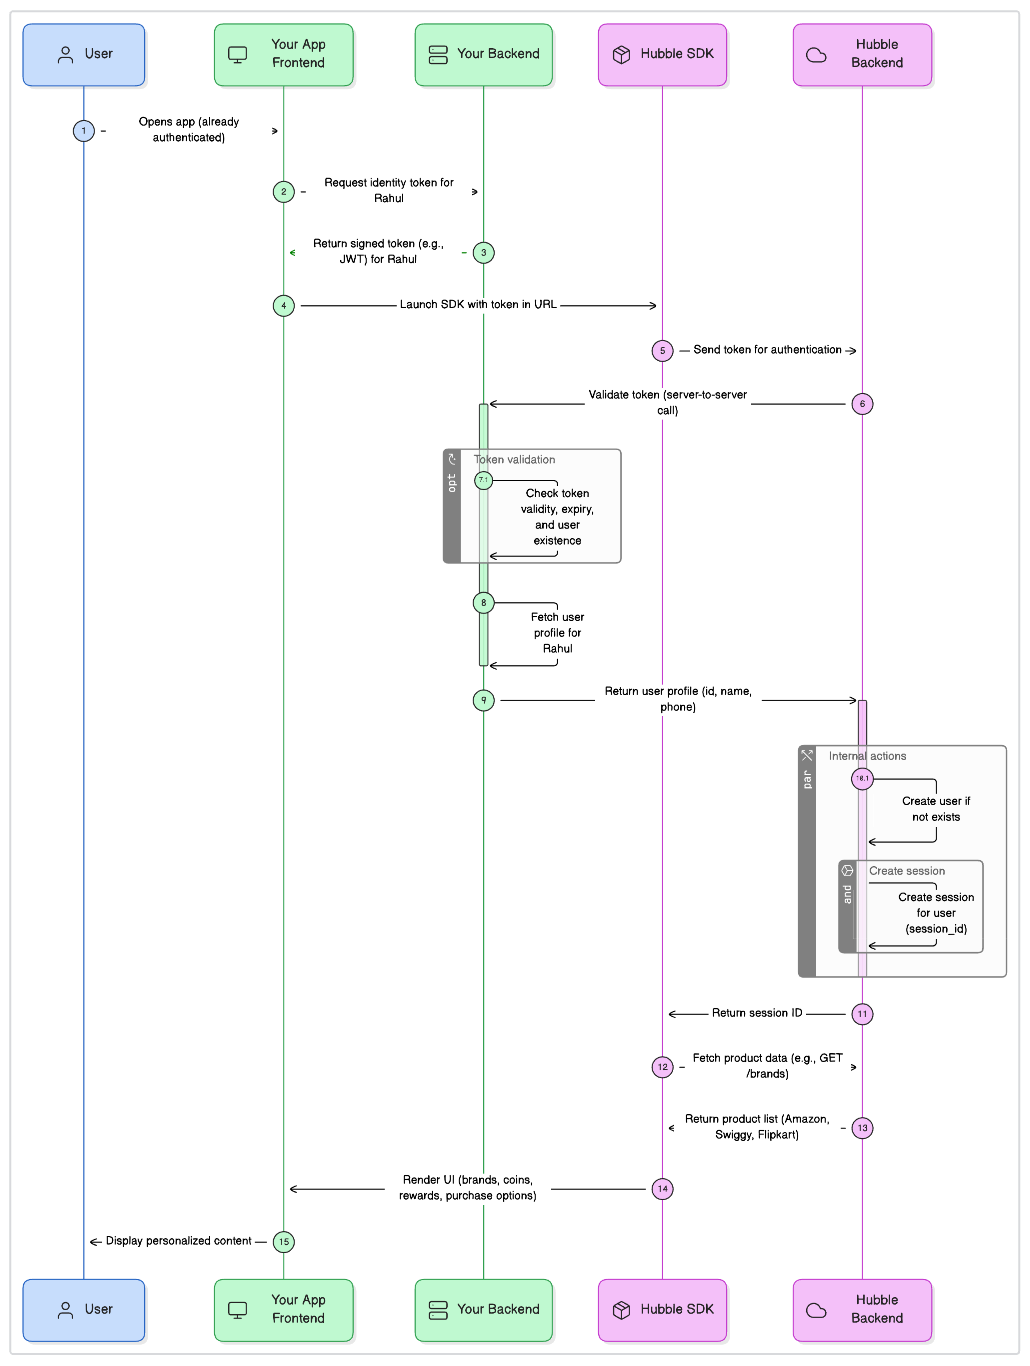
Before you can integrate the SDK into your application, you need to set up authentication. The Hubble SDK uses Single Sign-On (SSO) so that each user gets a personalized session with their own identity, transaction history, and coin balance.
2.1 How the SSO Flow Works
The critical thing to understand is the direction of the API call: Hubble calls YOUR backend, not the other way around.
-
Your frontend generates a token that uniquely identifies the currently logged-in user. This can be a session token, a JWT, a one-time code, or any string that your backend can validate. Best practices for generating this token are covered in the subsequent sections.
-
Your frontend passes this token in the SDK URL as the
tokenquery parameter. -
When the SDK loads, Hubble’s backend extracts the token from the URL and makes a
POST /ssorequest to your backend with this token. -
Your backend validates the token, identifies the user, and returns their details (
userId, name, phone number) to Hubble. -
Hubble creates a session for this user and the SDK loads with their personalized data.
2.2 The Backend Integration Base URL
During onboarding, you will provide Hubble with an integration base URL via the integration portal. This is the root URL of your backend that Hubble will use for all server-to-server calls — SSO authentication, coin balance checks, coin debits, and coin reversals.
Use the same integration base URL for both the SSO integration and the Coins integration (if you choose to implement it). Hubble appends specific paths to this base URL for each API. The base URL prefix must be the same across all endpoints.
Example: If your integration base URL is https://api.yourapp.com/hubble, Hubble will call:
| API | Full URL Called by Hubble |
|---|---|
| SSO | POST https://api.yourapp.com/hubble/sso |
| Coin Balance | GET https://api.yourapp.com/hubble/balance?userId=... |
| Coin Debit | POST https://api.yourapp.com/hubble/debit |
| Coin Reverse | POST https://api.yourapp.com/hubble/reverse |
2.3 What You Need to Build — SSO Endpoint
You need to build one API endpoint on your backend: the SSO endpoint. Hubble will call this endpoint every time a user opens the SDK.
{integrationBaseUrl}/sso| Property | Value |
|---|---|
| Method | POST |
| Path | {integrationBaseUrl}/sso |
| Called By | Hubble’s backend (not your frontend) |
| Authentication | X-Hubble-Secret header |
Request Body
Hubble sends the following JSON body:
{ "token": "<the-token-from-sdk-url>"}Successful Response (200 OK)
When the token is valid, return the user details:
{ "userId": "user-12345", "email": "user@example.com", "firstName": "John", "lastName": "Doe", "phoneNumber": "9876543210", "cohorts": ["premium", "beta"]}| Field | Required | Description |
|---|---|---|
userId | Required | Your unique identifier for this user. Must be consistent across sessions. |
firstName | Optional | User’s first name |
lastName | Optional | User’s last name |
phoneNumber | Optional | User’s number without country-code (10 digits). Required by some providers. |
email | Optional | User’s email address |
cohorts | Optional | Array of user segment strings for personalised experiences |
Invalid Token Response
When the token is invalid, expired, or unrecognised, return userId: null:
{ "userId": null}Returning userId: null tells Hubble that authentication failed. The SDK will show an error screen to the user.
2.4 Token Best Practices
The token you generate and pass in the SDK URL is entirely under your control. Here are the best practices:
- Generate a fresh token for every session. Your backend should generate a new token each time the user opens the SDK. Use a short-lived, random, or cryptographically signed string (JWT or one-time UUID) that your SSO endpoint can validate.
- Use short-lived tokens. A token that expires after 5–15 minutes is ideal. The SDK only needs the token at initialisation time.
- URL-encode the token. If your token contains special characters like
+,=, or&, you must URL-encode it before putting it in the query string.
Token URL Encoding Across Platforms
If your token contains special characters (especially +, =, or &, which are common in Base64-encoded tokens), they will be corrupted in the URL query string unless properly encoded. The + character is decoded as a space, & is treated as a parameter separator, and = is treated as a key-value delimiter. Your SSO endpoint then receives a modified token and validation fails silently.
Here is how to URL-encode the token on each platform:
| Platform | How to Encode |
|---|---|
| JavaScript (Web) | encodeURIComponent(token) |
| Kotlin (Android) | URLEncoder.encode(token, "UTF-8") |
| Swift (iOS) | token.addingPercentEncoding(withAllowedCharacters: .urlQueryAllowed) or use URLComponents with URLQueryItem |
| Dart (Flutter) | Uri.encodeComponent(token) |
| React Native | encodeURIComponent(token) (same as JavaScript) |
2.5 Verifying SSO Is Working
After implementing the SSO endpoint and generating real tokens, test the flow:
-
Construct an SDK URL with your staging credentials and a real token generated by your backend.
-
Open the URL in a browser. If SSO is working, the SDK will load the gift card store with the authenticated user’s session.
-
If SSO fails, the SDK will show an error page. Check your server logs to see if Hubble’s request arrived and whether your endpoint returned a valid response.
Debugging SSO Failures
In the staging environment, the SDK displays a Debug Info panel directly on the error screen. The debug panel shows:
- Base URL — The URL Hubble called. Verify this matches the integration base URL you registered with Hubble.
- Method — Should be POST.
- Partner Response Status — The HTTP status code your endpoint returned (e.g., 401, 403, 500).
- Partner Response — The response body your endpoint returned.
- Curl Command — A ready-to-use curl command that reproduces the exact request Hubble made to your endpoint.
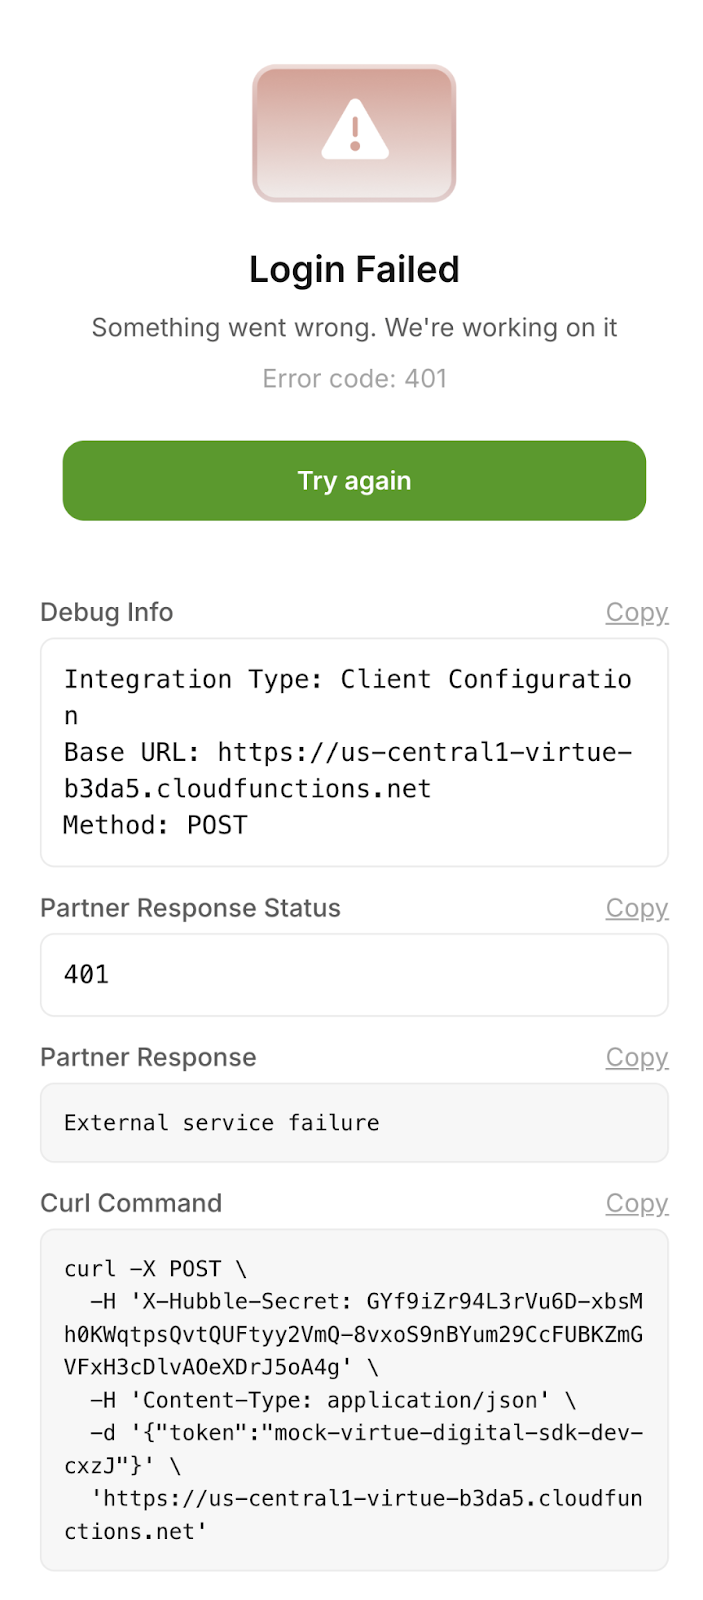
How to use the debug screen:
- Copy the Curl Command and run it in your terminal. This reproduces the exact request Hubble made. If your endpoint returns an error, you now have a reproducible test case.
- Check the Partner Response Status. If the API response is anything other than 200, the issue usually lies in the partner’s backend and they should verify their implementation.
- Check the Base URL. If this does not match your expected SSO endpoint, the wrong integration base URL was registered with Hubble. Contact the Hubble team to correct it.
- If the status is 200 but login still fails, check the Partner Response body. Your endpoint may be returning userId: null or a malformed JSON structure.
Full Reference: SSO Integration Reference
2.6 Session Management
Every time the SDK is loaded, it is initiated with a token. Hubble uses this token to authenticate the user via your SSO endpoint and creates a new session.
How Sessions Work
When a user opens the SDK with a valid SSO token, Hubble authenticates the token against your backend and creates a session. This session is tied to the user’s identity and persists across page loads within the SDK.
Session Duration
By default, an SDK session is valid for 24 hours. After this period, the user will need to re-authenticate with a fresh SSO token. If you need a different session duration, contact the Hubble team to customize this setting.
One Session Per User
A user can have only one active session at a time. If a user opens the SDK on a second device (Device B), the session on the first device (Device A) is automatically invalidated. The next time the user interacts with the SDK on Device A, they will be logged out and need to re-authenticate.
When to Call This API
You should call the session invalidation API in the following scenarios:
- User logout — When a user logs out of your app, invalidate their Hubble session to prevent access to their data.
- Account switching — If your app supports multiple accounts and the user switches accounts, invalidate the previous user’s session.
- Security events — If you detect suspicious activity (password change, device change, etc.), invalidate the session as a precaution.
Invalidating Sessions from Your Backend
| Property | Value |
|---|---|
| Method | POST |
| URL | https://api.myhubble.money/v1/auth/partner/logout-user |
| Header | X-PARTNER-SECRET (secret key shared by Hubble) |
| Content-Type | application/json |
{ "userId": "user-12345"}Full Reference: Session Invalidation API
Part III - SDK Integration
3.1 Understanding the SDK URL
The Hubble SDK is a hosted web application. You integrate it by loading a URL with your credentials and the user’s SSO token.
https://sdk.dev.myhubble.money/?clientId=YOUR_CLIENT_ID&appSecret=YOUR_APP_SECRET&token=YOUR_SSO_TOKEN&appVersion=1.0.0 // optional&deviceId=device-abc // optional| Parameter | Required | Description |
|---|---|---|
clientId | Required | Client ID provided by the Hubble team during onboarding |
appSecret | Required | App secret provided by the Hubble team (used for server-side config lookup) |
token | Required | SSO token for the current user, generated by your backend |
appVersion | Optional | App version string. Defaults to “10000”. |
deviceId | Optional | Device identifier for analytics tracking. |
3.2 Choose Your Platform
The Hubble SDK can be integrated on any platform that supports a WebView or iframe.
| Platform | Integration Method | Guide |
|---|---|---|
| Web | iframe with postMessage events | Web Integration Guide |
| Android | WebView with JavaScript interface | Android Integration Guide |
| iOS | WKWebView with script message handler | iOS Integration Guide |
| React Native | react-native-webview with onMessage | React Native Integration Guide |
| Flutter | webview_flutter with JavascriptChannel | Flutter Integration Guide |
SDK Events Overview
The SDK communicates with your app through JavaScript messages (events). All platforms receive the same event types, but the mechanism differs:
| Event | Description | When to Handle |
|---|---|---|
app_ready | SDK has fully loaded and is ready for interaction | Hide loading spinners, log initialization |
close | User tapped the close/back button in the SDK | Close the WebView and return to your app |
error | An error occurred in the SDK | Log the error, optionally show a fallback UI |
Full Reference: Web Integration Guide
Full Reference: Android Integration Guide
Full Reference: iOS Integration Guide
Full Reference: React Native Integration Guide
Full Reference: Flutter Integration Guide
Part IV - Payment Configuration
The Hubble SDK supports UPI and card payments. Most payment flows work automatically, but native mobile apps require some configuration for UPI payments to work correctly.
4.1 iOS UPI Configuration
The iOS Limitation
iOS restricts apps from checking which other apps are installed on the device. This is a privacy feature. However, for UPI payments to work, the SDK needs to know which UPI apps (PhonePe, GPay, Paytm, etc.) are available so it can show the correct payment options.
Passing Installed UPI Apps
To enable UPI payments in your iOS app, you need to declare the UPI app URL schemes in your Info.plist. This allows your app to query which UPI apps are installed.
Add the following to your Info.plist:
<key>LSApplicationQueriesSchemes</key><array> <string>phonepe</string> <string>tez</string> <string>paytmmp</string> <string>cred</string> <string>bhim</string></array>Why This Matters
Without these URL schemes declared, iOS will not allow your app to check for installed UPI apps. The SDK will fall back to showing a generic “Pay via UPI” option, which may open the wrong app or fail entirely. With the schemes declared, the SDK can show specific buttons for each installed UPI app, providing a smoother payment experience.
4.2 iOS WebView Background Behavior
When a user taps a UPI app to complete payment, your app goes to the background and the UPI app opens. iOS may suspend your app’s WebView while it is in the background, which can pause JavaScript execution.
When the user returns to your app after completing the payment, the WebView may have been suspended. JavaScript timers, network requests, and state updates may not have executed as expected.
4.3 Android Configuration
For Android apps, add the following queries to your AndroidManifest.xml to detect UPI apps:
<queries> <intent> <action android:name="android.intent.action.VIEW" /> <data android:scheme="upi" /> </intent></queries>Part V - Theme Customisation
5.1 How Theme Customisation Works
Hubble’s SDK can be configured to match your application’s visual identity. The process is Figma-based:
-
Hubble provides a Figma design file with customisable components.
-
You specify your brand colors, typography, and logo preferences.
-
Hubble applies the theme to your SDK configuration.
-
Theme updates apply to all new SDK sessions within minutes — no code changes required on your side.
5.2 What You Can Customize
| Element | Customisation Options |
|---|---|
| Themes | Primary color, secondary color, background colors, dark/light mode |
| Buttons | Button colors, border radius, text styles |
| Header | Logo, background color, text color |
| Search Bar | Placeholder text, background color, border style |
| Typography | Font family, font sizes, font weights |
5.3 Image Dimensions
| Element | Width | Height | Aspect Ratio | Format |
|---|---|---|---|---|
| Coin Image | 20 px | 20 px | 1:1 | PNG (transparent background) |
| Header Logo | 96 px | 40 px | 12:5 | PNG or SVG |
| Banner | 353 px | 199 px | 16:9 | PNG or JPG |
Full Reference: Theme Customization Reference
Part VI - Coins Integration (Optional)
6.1 Do You Need Coins Integration?
The Hubble SDK works in two modes:
-
Plain SDK (no coins): If your app does not have any in-app currency (coins, points, rewards, cashback, etc.), you are using the plain SDK. Gift card purchases are paid entirely through the payment gateway. You can skip this entire section and go directly to Part VII (Testing in Staging).
-
SDK with Coins: If your app has its own in-app currency that users should be able to spend on gift card purchases, read on. You will need to build three API endpoints on your backend.
Full Reference: Hubble Currency Engine
6.2 Technical Requirements
- HTTPS required: All three coin endpoints must be served over HTTPS with TLS 1.2 or higher.
- Content-Type: All requests and responses must use
application/json. - Same integration base URL: The coin APIs use the same integration base URL you provided for SSO (see section 2.2). You do not need to register a separate URL. If your SSO is at
https://api.yourapp.com/hubble/sso, your coin endpoints must be athttps://api.yourapp.com/hubble/balance,/debit, and/reverse.
Authentication
All requests from Hubble include the X-Hubble-Secret header with the same pre-shared secret used for SSO. Validate this header on every request to ensure the call is genuinely from Hubble.
6.3 How Coins Work
If your app has its own rewards currency (coins, points, cashback, etc.), you can integrate it with Hubble so that users can spend their balance for discounts on gift card purchases directly within the SDK. Hubble calls your coin APIs during the purchase flow - you maintain full control of your coin ledger.
If you do not have a coin system, skip this section entirely.
Hubble supports three models for how coins interact with the purchase. The model is configured on Hubble’s side during onboarding - you choose one model, and it applies to all transactions for your integration.
Model 1: Coins as Additional Discount
Coins give the user extra savings on top of the brand’s existing discount. The brand discount applies regardless of whether the user spends coins.
Example: A user buys a ₹1,000 Amazon voucher that already has a 5% discount (₹50 off). If the user has 100 coins (at 1 coin = ₹1), they can use them to get an additional ₹100 off. Their total savings become ₹150.
| Component | Amount |
|---|---|
| Gift Card Value | ₹1,000 |
| Brand Discount (5%) | −₹50 |
| Coins Used (100 coins @ ₹1 each) | −₹100 |
| User Pays | ₹850 |
The user gets ₹50 from the brand discount and ₹100 from coins, saving ₹150 total. If the user had zero coins, they would still get the ₹50 brand discount and pay ₹950.
Model 2: Coins to Fund the Discount
Coins are required to unlock the discount. The user must spend coins to get any savings at all. Without enough coins, the user pays full price with no discount. In this model, the payment gateway (PG) step is optional - if the coin value fully covers the discount, no PG transaction is needed.
Example: A user buys a ₹1,000 Amazon voucher with a ₹20 discount. To get this discount, the user must have and spend at least 20 coins. If they have 0 coins, they pay the full ₹1,000.
| Component | Amount |
|---|---|
| Gift Card Value | ₹1,000 |
| Discount Available | ₹20 |
| Coins Required to Unlock | 20 coins minimum |
| User Pays (with 20+ coins) | ₹980 |
| User Pays (with 0 coins) | ₹1,000 |
In this model, the discount exists but is gated behind coin spending. This is useful when you want to incentivize users to earn and hold coins in your app before they can access gift card discounts.
Model 3: Coins-Only Payment
The entire purchase is paid using coins. Here, the discount availability is optional with no payment gateway involved - the user’s coin balance is debited for the full gift card value. This model is typically used when your app’s coins have a direct monetary value and you want to offer gift cards as a redemption option for your rewards program.
| Component | Amount |
|---|---|
| Gift Card Value | ₹5,000 |
| Coins Debited (500 coins @ ₹1 each) | 500 coins |
| User Pays via Gateway | ₹0 |
6.4 What You Need to Build
You need to build three API endpoints on your backend. Hubble will call these endpoints during the gift card purchase flow. All three endpoints use the same integrationBaseUrl you provided for SSO.
For example, if your integrationBaseUrl is https://api.yourapp.com/hubble, Hubble will call:
GET https://api.yourapp.com/hubble/balancePOST https://api.yourapp.com/hubble/debitPOST https://api.yourapp.com/hubble/reverse
Authentication
All requests from Hubble include the X-Hubble-Secret header with the same pre-shared secret used for SSO. You must validate this header on every request.
6.5 API 1: Get Coin Balance
Hubble calls this endpoint to display the user’s current coin balance in the SDK.
{integrationBaseUrl}/balance?userId={partnerUserId}| Property | Value |
|---|---|
| Method | GET |
| Path | /balance?userId={partnerUserId} |
| Authentication | X-Hubble-Secret header |
Successful Response (200 OK)
{ "userId": "partner_user_123", "totalCoins": 1500.0}Error Responses
| Status Code | When to Return | Response Body |
|---|---|---|
200 | Success — return balance (even if 0) | {"userId": "...", "totalCoins": 0} |
401 | Invalid or missing X-Hubble-Secret | {"error": "Unauthorized"} |
404 | User not found | {"error": "User not found"} |
500 | Internal server error | {"error": "Internal server error"} |
6.6 API 2: Debit Coins
{integrationBaseUrl}/debit| Property | Value |
|---|---|
| Method | POST |
| Path | /debit |
| Authentication | X-Hubble-Secret header |
Request Body
{ "userId": "user-12345", "coins": 500, "referenceId": "01HRVY38NCAANDYPN3WVGJCDSG", "note": "Gift card purchase - Amazon ₹1000"}| Field | Description |
|---|---|
userId | The user whose coins to debit |
coins | Number of coins to debit |
referenceId | Unique transaction ID from Hubble (use as idempotency key) |
note | Human-readable description of the transaction |
Successful Response (200 OK)
{ "status": "SUCCESS", "transactionId": "your-internal-txn-id-123", "balance": 1000, "referenceId": "01HRVY38NCAANDYPN3WVGJCDSG"}Error Responses
| Status Code | When to Return | Response Body |
|---|---|---|
200 | Success — coins debited | {"status": "SUCCESS", ...} |
400 | Insufficient balance | {"error": "Insufficient balance"} |
401 | Invalid or missing X-Hubble-Secret | {"error": "Unauthorized"} |
404 | User not found | {"error": "User not found"} |
500 | Internal server error | {"error": "Internal server error"} |
6.7 API 3: Reverse Debit
{integrationBaseUrl}/reverseCalled by Hubble when a gift card order fails or is cancelled after coins have been debited. You must refund the coins to the user’s balance.
Request Body
{ "userId": "user-12345", "amount": 500, "referenceId": "01HRVY38NCAANDYPN3WVGJCDSG", "transactionId": "your-internal-txn-id-123"}| Field | Description |
|---|---|
userId | The user whose coins to refund |
amount | Number of coins to refund |
referenceId | Original transaction reference ID from the debit |
transactionId | The transactionId you returned in the debit response |
Successful Response (200 OK)
{ "status": "SUCCESS", "balance": 1500, "reversalTransactionId": "your-internal-reversal-id-456"}Error Responses
| Status Code | When to Return | Response Body |
|---|---|---|
200 | Success — coins refunded | {"status": "SUCCESS", ...} |
200 | Already reversed (idempotent) | {"status": "ALREADY_REVERSED", ...} |
401 | Invalid or missing X-Hubble-Secret | {"error": "Unauthorized"} |
404 | Original transaction not found | {"error": "Transaction not found"} |
500 | Internal server error | {"error": "Internal server error"} |
Full Reference: Coins Integration Reference
Part VII - Testing Basic Flow in Staging
Before moving to production, you should systematically test every part of your integration in the staging environment. This section walks through what to test and how to test it, including specific test amounts that trigger different behaviors.
7.1 Verify SSO with Multiple Users
Start by confirming that authentication works correctly for different users:
-
Generate SSO tokens for at least two different test users on your backend.
-
Load the SDK with the first user’s token. It should initialize without errors and show the gift card store.
-
Load the SDK with the second user’s token. Verify each user gets their own session with their own identity and transaction history.
-
Test with an invalid or expired token. The SDK should show an error page, confirming your SSO endpoint correctly rejects bad tokens.
7.2 Test UPI Payments (Native Apps)
If you configured UPI Intent (Part IV), test the payment flow on real devices:
- iOS: Open the SDK, select a brand, choose a denomination, and proceed to payment. UPI app icons (GPay, PhonePe, etc.) should appear. Tap one to verify the app opens.
- Android: Same flow. The system UPI app chooser should appear when the user initiates a UPI payment.
Note that actual payment completion in staging uses test money, but the UPI app switching behavior can be verified visually.
7.3 Test Coins Integration
If you implemented coins (Part VI), test the full coins flow:
-
Open the SDK. The user’s coin balance should be displayed (from your /balance API).
-
Select a brand and proceed to checkout. Enable coin usage in the checkout flow.
-
Complete the purchase. Verify your /debit API was called with the correct userId, coins amount, and referenceId.
-
Check that the user’s coin balance decreased by the correct amount.
To test coin reversal, you can trigger a failure scenario (see test amounts below). When a purchase fails after coins are debited, Hubble will call your /reverse API.
7.4 Test Brands and Special Amounts
The staging environment has specific brands and amounts configured for testing different outcomes.
Two Types of Failures
In a gift card purchase, there are two distinct stages where things can go wrong.
- Payment Failure: The payment itself fails (e.g., insufficient funds, UPI timeout, bank decline). The user’s money is not deducted. No voucher generation is attempted.
- Voucher Generation Failure: The payment succeeds (money is deducted), but the gift card could not be generated by the brand’s backend. The user has paid but did not receive a voucher. This requires a refund or retry.
These are fundamentally different scenarios. A payment failure is relatively benign (no money moved), but a voucher generation failure requires careful handling - the user has been charged and expects either a gift card or a refund.
Test Brands
| Brand | Expected Behavior |
|---|---|
| Flipkart | Orders complete with SUCCESS status |
| Myntra | Orders complete with FAILED status |
Testing Payment Failure
To test payment failure, use the special amount ₹813 on EatSure. This triggers an immediate payment failure at the payment step - no money is deducted and no voucher generation is attempted.
| Amount (₹) | Brand | Result |
|---|---|---|
| 813 | EatSure | Immediate payment failure (order fails instantly) |
Verify that your integration correctly shows the failure to the user, fires the appropriate SDK events, and does not deduct any coins (if applicable).
Testing Voucher Generation Failure
To test voucher generation failure, make a purchase on Myntra with any normal amount (not 813). The payment will succeed, but the voucher generation will fail.
Testing Brand with Zero Discount
This lets you test what the purchase experience looks like when there is no discount applied, important because some of your brands in production may also have zero discount.
| Brand | Result |
|---|---|
| EatSure/Nykaa | Purchase completed successfully with zero discount applied. |
Part VIII - Additional Features & Going to Production
Your core integration is working in staging. This section covers additional features (events, deep links, webhooks, cohorts, coupons) that enhance your integration, followed by how to test them and finally how to get production credentials and go live.
8.1 Events
The Hubble SDK emits analytics events as users navigate and interact with the gift card store. These events allow you to track user behavior in your analytics system (Mixpanel, CleverTap, Amplitude, etc.) and build funnels, cohorts, and reports around gift card engagement.
How Events Work
Events are sent via the same mechanism as action events. They have a type of "analytics" and include an event name and a properties object. Here is the structure:
{ "type": "analytics", "event": "payment_success", "properties": { "amount": 500, "referenceId": "ord_123", "provider": "RAZORPAY" }}Setting Up Event Tracking
Add analytics event handling alongside the action event listener you set up in Part III:
window.addEventListener("message", function (event) {  if (event.data.type === "action") {    // Handle action events (app_ready, close, error) as before  }
  if (event.data.type === "analytics") {    const eventName = event.data.event;    const properties = event.data.properties || {};
    // Send to your analytics provider    analytics.track(eventName, properties);
    // Log critical events for debugging    if (      ["payment_success", "payment_fail", "voucher_generation_fail"].includes(        eventName,      )    ) {      console.log("Critical SDK event:", eventName, properties);    }  }});
Key Events to Track
While the SDK emits many events, the following are the most important for production monitoring and business reporting:
| Event | Category | Why It Matters |
|---|---|---|
visit_home | Navigation | Track SDK open rate and user engagement |
visit_brand_l2 | Navigation | Track which brands users explore (includes brandName, productId) |
visit_checkout_summary | Navigation | Track checkout intent (includes amount, discount, coupon details) |
payment_initiated | Payment | Track payment attempts (includes brandName, amount, paymentMode) |
payment_success | Payment | Track completed payments (includes amount, referenceId, provider) |
payment_fail | Payment | Track failed payments (includes amount, failureReason) |
voucher_generation_success | Voucher | Track successful gift card delivery |
voucher_generation_fail | Voucher | Track failed gift card generation (critical for support) |
exited | Session | Track how users leave the SDK (includes through property) |
Native Platform Event Handling
On native platforms, events come through the same JavaScript bridge as action events. The event structure is identical. Filter events by their type field:
- Android: In your
@JavascriptInterfacehandler’sonAnalyticsEventmethod, you receive the event name and properties as separate parameters. Forward these to your analytics SDK. - iOS: In your
WKScriptMessageHandler, check iftype == "analytics"and extract theeventandpropertiesfields from the JSON.
Full Reference: Full Events Reference
8.2 Deep Links
Deep links allow you to open the SDK directly to a specific page instead of the default home screen. This is useful for promotional banners, push notifications, or in-app navigation that should take the user directly to a specific brand or transaction page.
How Deep Links Work
To deep link, you modify the URL path of the SDK URL. Instead of the default path, you append a route path before the query parameters. The query parameters (clientId, appSecret, token) remain the same.
Default URL (opens home):
https://sdk.myhubble.money/?clientId=...&appSecret=...&token=...Deep link to a specific brand:
https://sdk.myhubble.money/buy/{brandId}?clientId=...&appSecret=...&token=...Supported Routes
| Route | URL Path | Description |
|---|---|---|
| Home | / | Default home page with all brands |
| Brand Purchase | /buy/{brandId} | Opens the purchase page for a specific brand |
| Search | /search | Opens the search page |
| Transactions | /transactions | Opens the user’s purchase history |
| Coin Transactions | /coin-transactions | Opens the user’s coin transaction history |
| Help | /help | Opens the help and support page |
Brand Purchase Parameters
The brand purchase route (/buy/{brandId}) supports additional query parameters for customizing the experience:
| Parameter | Type | Description |
|---|---|---|
amount | number | Pre-fills the purchase amount. Must be within the brand’s allowed range. |
coupon | string | Applies a coupon code to the purchase automatically. |
skipToPayment | boolean | When true, skips directly to the payment step. |
consumeCoins | boolean | When true, applies available coins to the purchase. |
Example: Promotional Deep Link
Here is how to construct a deep link that opens a specific brand with a pre-filled amount and coupon:
const brandId = "01GMAVS2CHXR0XP1BZSTA9A44K"; // Amazon brandId from Hubbleconst deepLinkUrl =  `https://sdk.myhubble.money/buy/${brandId}` +  `?amount=500` +  `&coupon=SAVE20` +  `&clientId=${clientId}` +  `&appSecret=${appSecret}` +  `&token=${encodeURIComponent(userToken)}`;
// Load in iframe or WebViewdocument.getElementById("hubble-sdk").src = deepLinkUrl;
Getting the brandId
The brandId is a unique identifier for each brand in the Hubble catalog. This is NOT the brand name - it is an alphanumeric string like "01GMAVS2CHXR0XP1BZSTA9A44K". The Hubble team will provide you with the list of brandIds for your catalog. You can also find brandIds in the SDK events - the visit_brand_l2 event includes the productId which is the same as the brandId.
Full Reference: Deep Links Reference
8.3 Webhooks
Webhooks allow you to receive real-time server-side notifications about transactions and catalog changes. Unlike SDK events (which are client-side), webhooks are server-to-server callbacks that are reliable and cannot be missed due to client disconnections.
Setting Up Webhooks
To enable webhooks, provide the Hubble team with your webhook endpoint URL. Hubble will send POST requests to this URL for supported events. Your endpoint must:
- Accept POST requests with a JSON body.
- Return a 200 status code to acknowledge receipt. Any non-200 response will be treated as a delivery failure.
- Be publicly accessible over HTTPS.
Transaction Webhooks
Transaction webhooks fire when a gift card order reaches a terminal state. The webhook payload includes the full transaction details:
| Order Status | When It Fires | Voucher Data |
|---|---|---|
| COMPLETED | Gift card successfully generated | Includes voucher codes, PINs, and validity dates |
| FAILED | Order failed after payment | Empty vouchers array; coins are reversed if applicable |
| REVERSED | Manual reversal by Hubble team | Empty vouchers array; refund has been processed |
Example COMPLETED webhook payload:
{ "transactionReferenceId": "01HRVY38NCAANDYPN3WVGJCDSG", "partnerCoinTransactionId": "01HZ123EXAMPLE456789", "partnerCoinReversalTransactionId": null, "amount": 1000.0, "discountAmount": 50.0, "timestamp": "2024-01-15T14:30:22", "userId": "01HRW71319JNKJS6D3Q85X780R", "vouchers": [ { "id": "01HZ46Q0P0242STC8TBV926M8C", "brandId": "01JRSY42BBMKC2YS9TXMYSYN83", "brandName": "Swiggy", "cardNumber": "5333644476668777", "cardPin": "123456", "validTill": "2025-04-04", "amount": 1000.0 } ], "brandName": "Swiggy", "orderStatus": "COMPLETED"}Brand Update Webhooks
Brand webhooks notify you of catalog changes so you can update your local catalog or UI accordingly:
| Event | Description |
|---|---|
USER_DISCOUNT_UPDATED | Discount percentage changed for a brand |
NEW_BRAND_CREATED | A new brand has been added to the catalog |
BRAND_DISABLED | A brand has been removed or disabled |
PARTNER_DISCOUNT_UPDATED | Your partner-specific discount has been updated (includes validity dates) |
Webhook Signature Verification
All webhook requests include an X-Verify header containing an HMAC-SHA256 signature of the request body, encoded in Base64. You must verify this signature before processing any webhook to ensure the request genuinely came from Hubble.
Verification steps:
- Extract the
X-Verifyheader from the incoming request. - Read the raw request body as a string (before any JSON parsing or whitespace modification).
- Compute HMAC-SHA256 of the raw body using your webhook secret key, then Base64-encode the result.
- Compare your computed signature with the
X-Verifyheader. Only process the request if they match exactly.
// Node.js signature verificationconst crypto = require("crypto");
function verifyWebhook(rawBody, signatureHeader, secret) {  const hmac = crypto.createHmac("sha256", secret);  hmac.update(rawBody);  const expected = hmac.digest("base64");  return expected === signatureHeader;}
// In your webhook handler:app.post("/hubble-webhook", (req, res) => {  const rawBody = req.rawBody; // Must be the raw string, not parsed JSON  const signature = req.headers["x-verify"];  if (!verifyWebhook(rawBody, signature, WEBHOOK_SECRET)) {    return res.status(401).send("Invalid signature");  }  // Process the webhook...  res.status(200).send("OK");});
IP Whitelisting (Optional)
For additional security, you can whitelist Hubble’s production IP addresses on your firewall:
35.200.156.19934.47.147.24434.14.138.52
Full Reference: Webhooks Reference
8.4 User Cohorts
User cohorts let you segment users and show different brand catalogs and discount rates to each segment. Cohorts are driven by the SSO response - include a "cohort" field in your SSO JSON reply and Hubble applies the matching configuration automatically.
Common use cases include premium tiers with higher discounts, regional brand availability, corporate partnership rates, and time-limited promotional campaigns.
Cohort configuration can be managed by the Hubble team or self-service via the Cohort Configuration API at /v1/partners/cohort-config.
Full Reference: User Cohorts Reference
Full Reference: Cohort Configuration API
8.5 Coupons & Discount Management
Hubble provides APIs for managing promotional coupons and overriding brand discount percentages, giving you full control over your discount strategy.
Coupons provide additional discounts on top of existing brand offers. They support percentage or absolute discounts, brand filtering, user targeting (first-time users, etc.), usage limits, and listed vs. unlisted visibility. Manage coupons via the Coupon API at /v1/partners/coupons.
Discount Overrides let you change the default discount percentage for specific brands immediately, without creating coupons. Use the Discount Management API at /v1/partners/discount-override/config/brand-discounts.
You can combine deep links with coupons by adding the coupon query parameter to a brand purchase URL (e.g., ?coupon=SAVE20&amount=1000&...).
Full Reference: Coupon API Reference
Full Reference: Discount Management API Reference
8.6 Testing Features in Staging
Before going to production, verify that events, deep links, and webhooks are working correctly in your staging environment.
Testing Events
To confirm SDK events are reaching your analytics system:
-
Open the SDK in your staging environment and perform actions (browse brands, start a payment, complete a test purchase).
-
In your browser’s developer console (or native log output), verify that
"analytics"type messages are being received with the correct event names and properties. -
Check your analytics dashboard (Mixpanel, CleverTap, Amplitude, etc.) to confirm events appear with the expected properties.
-
Pay special attention to critical events:
payment_success,payment_fail, andvoucher_generation_fail. These should appear after you complete test purchases using the test brands (Flipkart, Myntra).
Testing Deep Links
To verify deep links work correctly:
-
Construct a deep link URL to a specific brand:
/buy/{brandId}?clientId=...&appSecret=...&token=... -
Load the URL in your WebView or iframe and confirm it opens directly to the brand purchase page (not the home screen).
-
Test with query parameters: add
amount=500and verify the amount is pre-filled. Addcoupon=TESTCODEand verify the coupon is applied. -
Test the other routes (search, transactions, help) to confirm they navigate correctly.
Testing Webhooks
To verify webhook delivery and signature validation:
-
Ensure your staging webhook URL is registered with the Hubble team (this is separate from your SSO URL registration).
-
Make a test purchase using a test brand. After the order completes (or fails), you should receive a webhook POST to your endpoint.
-
Verify the
X-Verifysignature by computing HMAC-SHA256 of the raw body and comparing with the header value. Log both the received and computed signatures during testing. -
Test both success and failure scenarios: use Flipkart for a successful order (
COMPLETEDwebhook) and Myntra for a failed voucher generation (FAILEDwebhook). -
Confirm your endpoint returns 200 for valid requests and properly rejects requests with invalid signatures.
8.7 Get Production Credentials & Go Live
Once all features are tested and working in staging, you are ready to move to production. Get your production credentials from the integration portal.
What You Need to Update
When switching from staging to production, update the following in your application:
| Setting | Staging Value | Production Value |
|---|---|---|
| SDK Base URL | sdk.dev.myhubble.money | sdk.myhubble.money |
| API Base URL | api.dev.myhubble.money | api.myhubble.money |
| clientId | Staging clientId | Production clientId |
| appSecret | Staging appSecret | Production appSecret |
| X-Hubble-Secret | Staging secret | Production secret |
Production SSO URL Registration
You must tell the Hubble team your production backend base URL for SSO (and coins, if applicable). This is often different from your staging URL.
Steps to Go Live
-
Request production credentials: Contact the Hubble team to receive your production clientId, appSecret, and X-Hubble-Secret. These are different from your staging credentials.
-
Register your production URLs: Provide your production integration base URL (for SSO, coins APIs) and production webhook URL to the Hubble team.
-
Configure environment variables: Store production credentials in environment variables or a secrets manager - never hardcode them. Your code should switch between staging and production credentials based on the environment.
-
Deploy your backend: Ensure your SSO endpoint, coins APIs (if applicable), and webhook endpoint are deployed and publicly accessible on your production domain.
-
Update the SDK URL: Switch the SDK URL from the staging domain to the production domain. The Hubble team will provide the production SDK base URL.
-
Verify theme and catalog: Open the SDK in production and verify that your theme customization, brand catalog, and discount configurations match what you tested in staging.
-
End-to-end test: Perform a complete purchase flow on a real device in production to confirm everything works end-to-end, including SSO, payment, voucher delivery, events, and webhooks.
Appendix
Partner API Summary
All endpoints your backend must implement share the same integration base URL you register with Hubble during onboarding.
Required APIs
| API | Method | Path | Called By | Auth |
|---|---|---|---|---|
| SSO | POST | /sso | Hubble | X-Hubble-Secret |
Coins APIs (If Using Coins)
| API | Method | Path | Purpose |
|---|---|---|---|
| Get Balance | GET | /balance?userId={id} | Return user’s coin balance |
| Debit Coins | POST | /debit | Deduct coins for a purchase |
| Reverse Debit | POST | /reverse | Refund coins on failed/cancelled order |
Webhook Endpoint (Recommended)
| API | Method | Your Endpoint | Purpose |
|---|---|---|---|
| Webhook Handler | POST | Your webhook URL | Receive transaction status and brand update notifications |
Hubble APIs You Call
| API | Method | Hubble Endpoint | Purpose |
|---|---|---|---|
| Session Invalidation | POST | /v1/auth/partner/logout-user | Invalidate SDK session on user logout |
| Coupon Management | CRUD | /v1/partners/coupons | Create, read, update, delete coupons |
| Discount Overrides | GET/PUT/POST | /v1/partners/discount-override/... | Override brand discounts |
| Cohort Config | CRUD | /v1/partners/cohort-config | Manage user cohort configurations |
Authentication Summary
| Credential | Used For | Direction |
|---|---|---|
clientId + appSecret | SDK URL query parameters | Frontend → Hubble SDK |
X-Hubble-Secret | SSO and Coins API calls | Hubble → Your Backend |
X-PARTNER-SECRET | Session invalidation API | Your Backend → Hubble |
| Bearer Token | Coupon, Discount, Cohort APIs | Your Backend → Hubble |
| Webhook Secret | HMAC-SHA256 signature verification | Hubble → Your Backend |