SSO Setup
Before you can integrate the SDK into your application, you need to set up authentication. The Hubble SDK uses Single Sign-On (SSO) so that each user gets a personalized session with their own identity, transaction history, and coin balance.
When Hubble's SDK is invoked, we create a proxy user in our system and all API calls happen against the session generated for that user. SSO is how you pass the logged-in user's identity to Hubble.
JWT SSO
The partner signs a short-lived JWT on their backend. The partner frontend passes that JWT to the SDK, and Hubble verifies it locally using the partner's pre-registered public key. No inbound /sso endpoint is required on the partner side.
Flow
- The partner backend creates a short-lived JWT for the logged-in user.
- The partner frontend passes that JWT as the
tokenfield when initialising the SDK. - Hubble reads
issto identify the partner, verifies the JWT signature, validates claims, and creates the user/session.
Security Model
Hubble uses an asymmetric key approach: the partner signs tokens with a private key that never leaves their infrastructure, and Hubble verifies them using the partner's public key registered during onboarding.
| Who holds it | What it does | |
|---|---|---|
| Private Key | Partner's backend only | Signs the JWT, must never be shared or exposed |
| Public Key | Shared with Hubble once | Used by Hubble to verify the JWT signature |
A few things the partner should always ensure:
- The private key lives only on the partner's backend server, it must never be checked into version control, logged, or transmitted anywhere
- Tokens are signed using
RS256(RSA Signature with SHA-256), no other algorithm is accepted - Every token must be generated fresh on each request with an expiry of exactly 60 seconds (
exp = iat + 60)
Each token is single-use for the SDK handshake. A short expiry window ensures that even if a token is intercepted, it cannot be replayed. The partner must never cache or reuse tokens, always generate a new one each time a user opens Hubble.
One-time Setup: Generate a Key Pair
The partner needs two keys: a private key (stays on the partner's server forever) and a public key (shared with Hubble once during onboarding). Use openssl to generate a 2048-bit RSA key pair:
# Step 1 — Generate the private key
openssl genrsa -out private_key.pem 2048

# Step 2 — Extract the public key from it
openssl rsa -in private_key.pem -pubout -out public_key.pem
The private key must never be exposed. It should not be committed to version control, logged, or sent anywhere outside the partner's backend infrastructure. Only public_key.pem is shared with Hubble, once, during onboarding.
What goes inside the JWT?
Every JWT the partner generates must include these fields:
| Field | What to put here |
|---|---|
sub | The partner's internal user ID |
iss | The partner's Hubble clientId (provided during onboarding) |
iat | Current timestamp (Unix) |
exp | Expiry timestamp — always iat + 60 seconds |
phoneNumber | User's 10-digit phone number (without country code) |
The partner can also include these optional fields to enrich the user's profile in Hubble:
| Field | What it's for |
|---|---|
name | User's display name |
email | User's email address |
cohorts | Groups the user belongs to, used for offers/eligibility (e.g. ["premium", "beta"]) |
Example JWT Payload
{
  "sub": "user_123",
  "iss": "partner-client-id",
  "iat": 1711929600,
  "exp": 1711929660,
  "name": "John Doe",
  "email": "john@example.com",
  "phoneNumber": "9999912345",
  "cohorts": ["premium", "beta"]
}
Signing Examples
- Python
- Node.js
- Java
- Go
- Ruby
- Kotlin
- PHP
- C#
- Swift
- Dart
# pip install PyJWT cryptography
import datetime
import jwt

with open("private_key.pem", "rb") as f:
    private_key = f.read()

now = datetime.datetime.now(datetime.timezone.utc)

payload = {
    "sub": "user_123",
    "iss": "partner-client-id",
    "iat": now,
    "exp": now + datetime.timedelta(seconds=60),
    "name": "John Doe",
    "email": "john@example.com",
    "phoneNumber": "9999912345",
    "cohorts": ["premium", "beta"],
}

token = jwt.encode(payload, private_key, algorithm="RS256")
print(token)
// npm install jsonwebtoken
const fs = require("fs");
const jwt = require("jsonwebtoken");

const privateKey = fs.readFileSync("private_key.pem");

const now = Math.floor(Date.now() / 1000);

const payload = {
  sub: "user_123",
  iss: "partner-client-id",
  iat: now,
  exp: now + 60,
  name: "John Doe",
  email: "john@example.com",
  phoneNumber: "9999912345",
  cohorts: ["premium", "beta"],
};

const token = jwt.sign(payload, privateKey, { algorithm: "RS256" });
console.log(token);
// Maven: com.auth0:java-jwt, org.bouncycastle:bcpkix-jdk18on
import com.auth0.jwt.JWT;
import com.auth0.jwt.algorithms.Algorithm;
import org.bouncycastle.util.io.pem.PemReader;

import java.io.FileReader;
import java.security.KeyFactory;
import java.security.interfaces.RSAPrivateKey;
import java.security.spec.PKCS8EncodedKeySpec;
import java.util.Date;
import java.util.List;

PemReader pemReader = new PemReader(new FileReader("private_key.pem"));
byte[] keyBytes = pemReader.readPemObject().getContent();
pemReader.close();

RSAPrivateKey privateKey = (RSAPrivateKey) KeyFactory
    .getInstance("RSA")
    .generatePrivate(new PKCS8EncodedKeySpec(keyBytes));

Algorithm algorithm = Algorithm.RSA256(null, privateKey);

long now = System.currentTimeMillis();

String token = JWT.create()
    .withSubject("user_123")
    .withIssuer("partner-client-id")
    .withIssuedAt(new Date(now))
    .withExpiresAt(new Date(now + 60_000))
    .withClaim("name", "John Doe")
    .withClaim("email", "john@example.com")
    .withClaim("phoneNumber", "9999912345")
    .withClaim("cohorts", List.of("premium", "beta"))
    .sign(algorithm);

System.out.println(token);
// go get github.com/golang-jwt/jwt/v5
package main

import (
    "crypto/x509"
    "encoding/pem"
    "fmt"
    "os"
    "time"

    "github.com/golang-jwt/jwt/v5"
)

func main() {
    keyBytes, _ := os.ReadFile("private_key.pem")
    block, _ := pem.Decode(keyBytes)
    privateKey, _ := x509.ParsePKCS1PrivateKey(block.Bytes)

    now := time.Now()

    claims := jwt.MapClaims{
        "sub":         "user_123",
        "iss":         "partner-client-id",
        "iat":         now.Unix(),
        "exp":         now.Add(60 * time.Second).Unix(),
        "name":        "John Doe",
        "email":       "john@example.com",
        "phoneNumber": "9999912345",
        "cohorts":     []string{"premium", "beta"},
    }

    token := jwt.NewWithClaims(jwt.SigningMethodRS256, claims)
    signed, _ := token.SignedString(privateKey)
    fmt.Println(signed)
}
# gem install jwt
require "jwt"

private_key = OpenSSL::PKey::RSA.new(File.read("private_key.pem"))

now = Time.now.to_i

payload = {
  sub: "user_123",
  iss: "partner-client-id",
  iat: now,
  exp: now + 60,
  name: "John Doe",
  email: "john@example.com",
  phoneNumber: "9999912345",
  cohorts: ["premium", "beta"]
}

token = JWT.encode(payload, private_key, "RS256")
puts token
// Maven/Gradle: com.auth0:java-jwt, org.bouncycastle:bcpkix-jdk18on
import com.auth0.jwt.JWT
import com.auth0.jwt.algorithms.Algorithm
import org.bouncycastle.util.io.pem.PemReader
import java.io.FileReader
import java.security.KeyFactory
import java.security.interfaces.RSAPrivateKey
import java.security.spec.PKCS8EncodedKeySpec
import java.util.Date

val keyBytes = PemReader(FileReader("private_key.pem")).use { it.readPemObject().content }
val privateKey = KeyFactory.getInstance("RSA")
    .generatePrivate(PKCS8EncodedKeySpec(keyBytes)) as RSAPrivateKey

val now = System.currentTimeMillis()

val token = JWT.create()
    .withSubject("user_123")
    .withIssuer("partner-client-id")
    .withIssuedAt(Date(now))
    .withExpiresAt(Date(now + 60_000))
    .withClaim("name", "John Doe")
    .withClaim("email", "john@example.com")
    .withClaim("phoneNumber", "9999912345")
    .withClaim("cohorts", listOf("premium", "beta"))
    .sign(Algorithm.RSA256(null, privateKey))

println(token)
<?php
// composer require firebase/php-jwt
use Firebase\JWT\JWT;

$privateKey = file_get_contents("private_key.pem");

$now = time();

$payload = [
    "sub"         => "user_123",
    "iss"         => "partner-client-id",
    "iat"         => $now,
    "exp"         => $now + 60,
    "name"        => "John Doe",
    "email"       => "john@example.com",
    "phoneNumber" => "9999912345",
    "cohorts"     => ["premium", "beta"],
];

$token = JWT::encode($payload, $privateKey, "RS256");
echo $token;
// dotnet add package System.IdentityModel.Tokens.Jwt
using System.IdentityModel.Tokens.Jwt;
using System.Security.Claims;
using System.Security.Cryptography;
using Microsoft.IdentityModel.Tokens;

using var rsa = RSA.Create();
rsa.ImportFromPem(File.ReadAllText("private_key.pem"));

var credentials = new SigningCredentials(
    new RsaSecurityKey(rsa),
    SecurityAlgorithms.RsaSha256
);

var now = DateTimeOffset.UtcNow;

var token = new JwtSecurityToken(
    issuer: "partner-client-id",
    claims: new[]
    {
        new Claim(JwtRegisteredClaimNames.Sub, "user_123"),
        new Claim(JwtRegisteredClaimNames.Iat, now.ToUnixTimeSeconds().ToString()),
        new Claim("name", "John Doe"),
        new Claim("email", "john@example.com"),
        new Claim("phoneNumber", "9999912345"),
        new Claim("cohorts", """["premium","beta"]"""),
    },
    notBefore: now.UtcDateTime,
    expires: now.AddSeconds(60).UtcDateTime,
    signingCredentials: credentials
);

var tokenString = new JwtSecurityTokenHandler().WriteToken(token);
Console.WriteLine(tokenString);
// swift-jwt: https://github.com/Kitura/Swift-JWT
import SwiftJWT
import Foundation

struct HubbleClaims: Claims {
    let sub: String
    let iss: String
    let iat: Date
    let exp: Date
    let phoneNumber: String
    let name: String?
    let email: String?
    let cohorts: [String]?
}

let privateKeyURL = URL(fileURLWithPath: "private_key.pem")
let privateKey = try Data(contentsOf: privateKeyURL)

let now = Date()
let claims = HubbleClaims(
    sub: "user_123",
    iss: "partner-client-id",
    iat: now,
    exp: now.addingTimeInterval(60),
    phoneNumber: "9999912345",
    name: "John Doe",
    email: "john@example.com",
    cohorts: ["premium", "beta"]
)

var jwt = JWT(claims: claims)
let token = try jwt.sign(using: .rs256(privateKey: privateKey))
print(token)
// dart pub add dart_jsonwebtoken
import 'dart:io';
import 'package:dart_jsonwebtoken/dart_jsonwebtoken.dart';

void main() {
  final privateKeyPem = File('private_key.pem').readAsStringSync();
  final privateKey = RSAPrivateKey(privateKeyPem);

  final now = DateTime.now().millisecondsSinceEpoch ~/ 1000;

  final jwt = JWT(
    {
      'sub': 'user_123',
      'iss': 'partner-client-id',
      'iat': now,
      'exp': now + 60,
      'phoneNumber': '9999912345',
      'name': 'John Doe',
      'email': 'john@example.com',
      'cohorts': ['premium', 'beta'],
    },
  );

  final token = jwt.sign(privateKey, algorithm: JWTAlgorithm.RS256);
  print(token);
}
Onboarding
- Generate an RSA key pair using the
opensslcommands above - Receive the
clientIdfrom Hubble via the Integration Portal to use as theissclaim in your tokens - Submit the contents of
public_key.pemon the Integration Portal - Once configured, the partner can start issuing tokens immediately
Classic SSO (Legacy)
This flow is for existing partners only. New integrations should use JWT SSO above.
How the SSO Flow Works
The critical thing to understand is the direction of the API call: Hubble calls YOUR backend, not the other way around.
-
Your frontend generates a token that uniquely identifies the currently logged-in user. This can be a session token, a JWT, a one-time code, or any string that your backend can validate. Best practices for generating this token are covered in the subsequent sections.
-
Your frontend passes this token in the SDK URL as the
tokenquery parameter. -
When the SDK loads, Hubble's backend extracts the token from the URL and makes a
POST /ssorequest to your backend with this token. -
Your backend validates the token, identifies the user, and returns their details (
userId, name, phone number) to Hubble. -
Hubble creates a session for this user and the SDK loads with their personalized data.
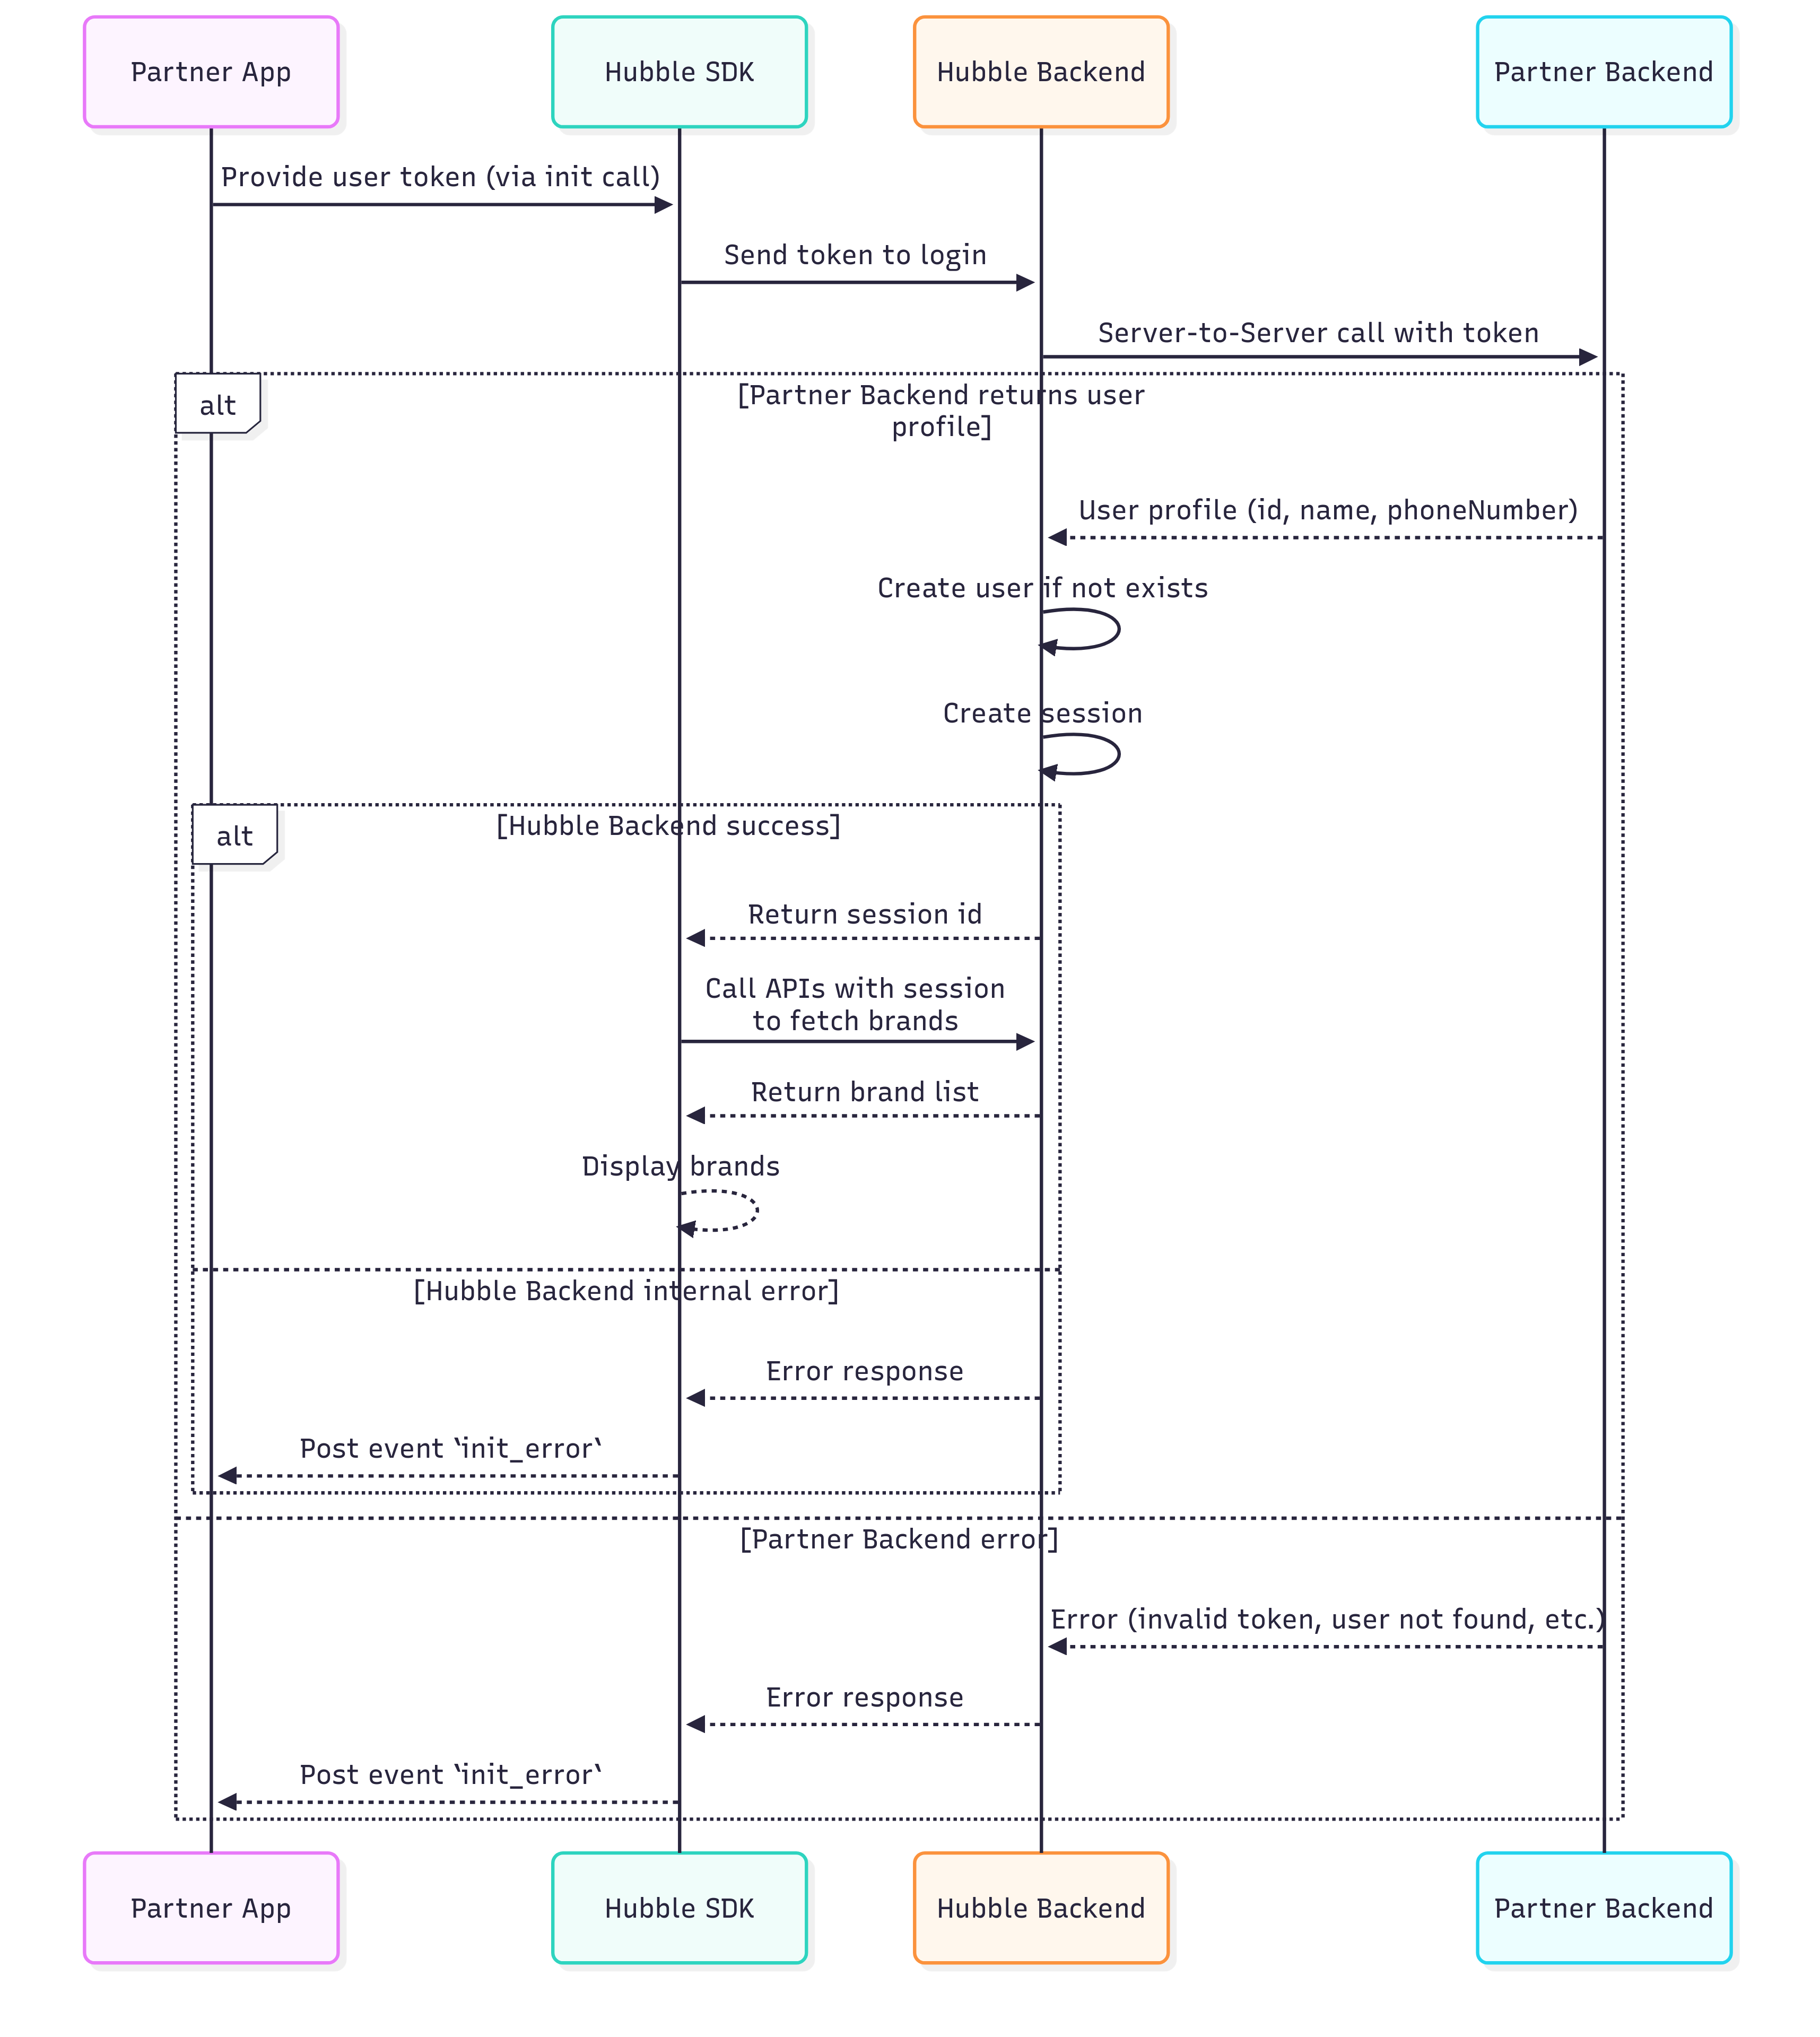
Hubble calls YOUR API to validate the token. You do not call Hubble. Your backend must expose an SSO endpoint that Hubble can reach over the internet.
The Backend Integration Base URL
During onboarding, you will provide Hubble with an integration base URL via the integration portal. This is the root URL of your backend that Hubble will use for all server-to-server calls — SSO authentication, coin balance checks, coin debits, and coin reversals.
Use the same integration base URL for both the SSO integration and the Coins integration (if you choose to implement it). Hubble appends specific paths to this base URL for each API. The base URL prefix must be the same across all endpoints.
Example: If your integration base URL is https://api.yourapp.com/hubble, Hubble will call:
| API | Full URL Called by Hubble |
|---|---|
| SSO | POST https://api.yourapp.com/hubble/sso |
| Coin Balance | GET https://api.yourapp.com/hubble/balance?userId=... |
| Coin Debit | POST https://api.yourapp.com/hubble/debit |
| Coin Reverse | POST https://api.yourapp.com/hubble/reverse |
You do not need to register separate URLs for SSO and coins. All endpoints share the same integration base URL. When building your APIs, ensure they all live under the same prefix. For example, if your SSO endpoint is at https://api.yourapp.com/hubble/sso, your coin balance endpoint must be at https://api.yourapp.com/hubble/balance - not at a different domain or path prefix.
You must provide separate base URLs for staging and production. If you have your staging SSO working but forget to register the production SSO URL, the SDK will fail to authenticate users in production.
Token Best Practices
The token you generate and pass in the SDK URL is entirely under your control. Here are the best practices:
- Generate a fresh token for every session. Your backend should generate a new token each time the user opens the SDK. This token should be a short-lived, random, or cryptographically signed string (such as a JWT or a one-time UUID) that your SSO endpoint can validate. If a static or hardcoded token is used, it cannot be revoked or expired, meaning anyone who obtains it can impersonate the user indefinitely.
- Use short-lived tokens. A token that expires after 5–15 minutes is ideal. The SDK only needs the token at initialisation time.
- URL-encode the token. If your token contains special characters like
+,=, or&, you must URL-encode it before putting it in the query string. The + character is especially problematic: it gets interpreted as a space in URL query parameters, which silently corrupts the token and causes SSO to fail.
Never use a user's phone number, email address, or userId as the token value. These are static, predictable identifiers that anyone can guess. If the token is a phone number, any person who knows another user's phone number can open the SDK as that user and see their transaction history, coin balance, and personal data.
The token must be a value that only your backend can generate and validate - something that cannot be guessed or reused.
Token URL Encoding Across Platforms
If your token contains special characters (especially +, =, or &, which are common in Base64-encoded tokens), they will be corrupted in the URL query string unless properly encoded. The + character is decoded as a space, & is treated as a parameter separator, and = is treated as a key-value delimiter. Your SSO endpoint then receives a modified token and validation fails silently.
Here is how to URL-encode the token on each platform:
| Platform | How to Encode |
|---|---|
| JavaScript (Web) | encodeURIComponent(token) |
| Kotlin (Android) | URLEncoder.encode(token, "UTF-8") |
| Swift (iOS) | token.addingPercentEncoding(withAllowedCharacters: .urlQueryAllowed) or use URLComponents with URLQueryItem which handles encoding automatically |
| Dart (Flutter) | Uri.encodeComponent(token) |
| React Native | encodeURIComponent(token) (same as JavaScript) |
If you use Swift's URLComponents with URLQueryItem to build your SDK URL (as shown in the iOS integration guide), the token is automatically URL-encoded. You do not need to manually encode it. This is the recommended approach for iOS.
Verifying SSO Is Working
After implementing the SSO endpoint and generating real tokens, test the flow:
-
Construct an SDK URL with your staging credentials and a real token generated by your backend.
-
Open the URL in a browser. If SSO is working, the SDK will load the gift card store with the authenticated user's session.
-
If SSO fails, the SDK will show an error page. Check your server logs to see if Hubble's request arrived and whether your endpoint returned a valid response.
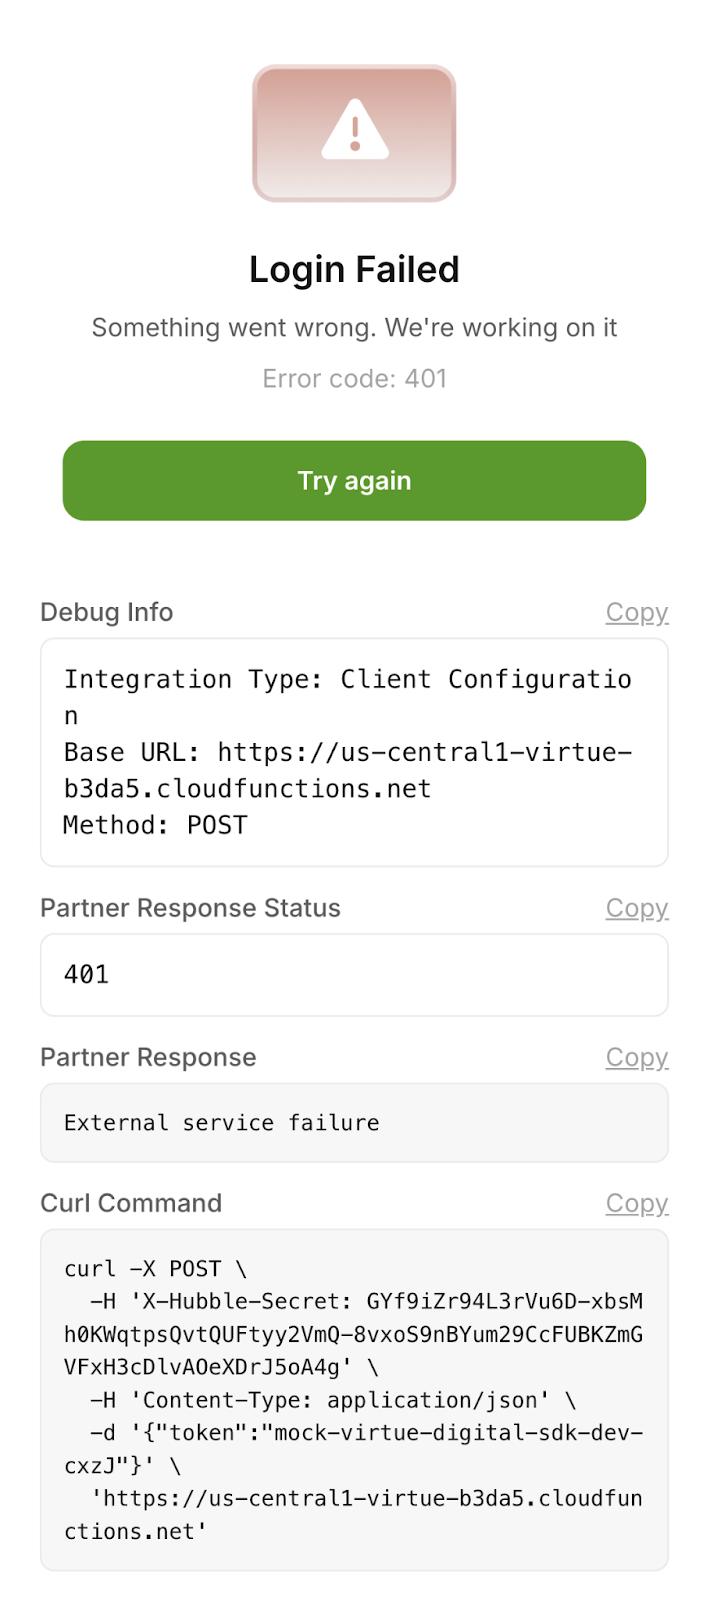
Debugging SSO Failures
If the SDK fails to authenticate the user, it shows an error page with the message "Login Failed" and an error code. In the staging environment, the SDK also displays a Debug Info panel directly on the error screen, giving you everything you need to diagnose the issue without checking server logs.
The debug panel shows:
- Base URL — The URL Hubble called. Verify this matches the integration base URL you registered with Hubble.
- Method — Should be POST.
- Partner Response Status — The HTTP status code your endpoint returned (e.g., 401, 403, 500). This tells you exactly how your backend responded.
- Partner Response — The response body your endpoint returned. (e.g., "External service failure"). This is your own error message, so use it to trace the issue in your backend logs.
- Curl Command — A ready-to-use curl command that reproduces the exact request Hubble made to your endpoint. Copy this and run it from your terminal to debug your SSO endpoint directly.
The debug panel is only shown in the staging environment. In production, users see a generic error page without debug information.
How to use the debug screen:
- Copy the Curl Command and run it in your terminal. This reproduces the exact request Hubble made. If your endpoint returns an error, you now have a reproducible test case.
- Check the Partner Response Status. If the API response is anything other than 200, the issue usually lies in the partner's backend and they should verify their implementation.
- Check the Base URL. If this does not match your expected SSO endpoint, the wrong integration base URL was registered with Hubble. Contact the Hubble team to correct it.
- If the status is 200 but login still fails, check the Partner Response body. Your endpoint may be returning
userId: nullor a malformed JSON structure.
API Request/Response
You need to build one API endpoint on your backend: the SSO endpoint. Hubble will call this endpoint every time a user opens the SDK.
Request
/ssoHeaders:
X-Hubble-Secret(string, required) — Pre-shared secret provided during onboarding
Body:
token(string, required) — SSO token generated by the partner system. Token validation logic is fully owned by the partner.
{
  "token": "<your-token>"
}
Response (200 OK):
{
  "userId": "test-user-123",
  "email": "testuser@example.com",
  "firstName": "Test",
  "lastName": "User",
  "phoneNumber": "1234567890",
  "cohorts": ["premium", "beta"]
}
Response Fields:
userId(string, nullable) - Your unique identifier for this user. Must be consistent across sessions.email(string, optional) - User’s email addressfirstName(string, optional) - User’s first namelastName(string, optional) - User’s last namephoneNumber(string, optional) - User’s phone number (10 digits).cohorts(array of strings, optional) - Array of user segment strings for personalized experiences
Invalid Token Response (401 or 400):
When the token is invalid, expired, or unrecognized, return:
{
  "userId": null
}
Returning userId: null tells Hubble that authentication failed. The SDK will show an error screen to the user.
Example:
curl -X POST "https://partner-api.example.com/sso" \
  -H "X-Hubble-Secret: your-secret-key" \
  -H "Content-Type: application/json" \
  --data '{"token": "sso-token"}'