SSO Integration
SDK - SSO Integration Instructions
When Hubble’s SDK is invoked, we create a proxy user in our system and all API calls happen against the session generated for that user. SSO is how you pass the logged-in user’s identity to Hubble.
JWT SSO
The partner signs a short-lived JWT on their backend. The partner frontend passes that JWT to the SDK, and Hubble verifies it locally using the partner’s pre-registered public key. No inbound /sso endpoint is required on the partner side.
Flow
- The partner backend creates a short-lived JWT for the logged-in user.
- The partner frontend passes that JWT as the
tokenfield when initialising the SDK. - Hubble reads
issto identify the partner, verifies the JWT signature, validates claims, and creates the user/session.
Security Model
Hubble uses an asymmetric key approach, the partner signs tokens with a private key that never leaves their infrastructure, and Hubble verifies them using the partner’s public key registered during onboarding.
| Who holds it | What it does | |
|---|---|---|
| Private Key | Partner’s backend only | Signs the JWT, must never be shared or exposed |
| Public Key | Shared with Hubble once | Used by Hubble to verify the JWT signature |
A few things the partner should always ensure:
- The private key lives only on the partner’s backend server, it must never be checked into version control, logged, or transmitted anywhere
- Tokens are signed using
RS256(RSA Signature with SHA-256), no other algorithm is accepted - Every token must be generated fresh on each request with an expiry of exactly
60 seconds (
exp = iat + 60)
⏱️ Why 60 seconds? Each token is single-use for the SDK handshake. A short expiry window ensures that even if a token is intercepted, it cannot be replayed. The partner must never cache or reuse tokens, always generate a new one each time a user opens Hubble.
One-time Setup: Generate a Key Pair
The partner needs two keys: a private key (stays on the partner’s server forever) and a public key (shared with Hubble once during onboarding).
Use openssl to generate a 2048-bit RSA key pair:
# Step 1 — Generate the private keyopenssl genrsa -out private_key.pem 2048
# Step 2 — Extract the public key from itopenssl rsa -in private_key.pem -pubout -out public_key.pemWhat goes inside the JWT?
Every JWT the partner generates must include these fields:
| Field | What to put here |
|---|---|
sub | The partner’s internal user ID |
iss | The partner’s Hubble clientId (provided during onboarding) |
iat | Current timestamp (Unix) |
exp | Expiry timestamp — always iat + 60 seconds |
phoneNumber | User’s phone number with country code |
The partner can also include these optional fields to enrich the user’s profile in Hubble:
| Field | What it’s for |
|---|---|
name | User’s display name |
email | User’s email address |
cohorts | Groups the user belongs to, used for offers/eligibility (e.g. ["premium", "beta"]) |
Example JWT Payload
{ "sub": "user_123", "iss": "partner-client-id", "iat": 1711929600, "exp": 1711929660, "name": "John Doe", "email": "john@example.com", "phoneNumber": "919999912345", "cohorts": ["premium", "beta"]}Signing Examples
# pip install PyJWT cryptographyimport datetimeimport jwt
with open("private_key.pem", "rb") as f:    private_key = f.read()
now = datetime.datetime.now(datetime.timezone.utc)
payload = {    "sub": "user_123",    "iss": "partner-client-id",    "iat": now,    "exp": now + datetime.timedelta(seconds=60),    "name": "John Doe",    "email": "john@example.com",    "phoneNumber": "919999912345",    "cohorts": ["premium", "beta"],}
token = jwt.encode(payload, private_key, algorithm="RS256")print(token)
// npm install jsonwebtokenconst fs = require("fs");const jwt = require("jsonwebtoken");
const privateKey = fs.readFileSync("private_key.pem");
const now = Math.floor(Date.now() / 1000);
const payload = { sub: "user_123", iss: "partner-client-id", iat: now, exp: now + 60, name: "John Doe", email: "john@example.com", phoneNumber: "919999912345", cohorts: ["premium", "beta"],};
const token = jwt.sign(payload, privateKey, { algorithm: "RS256" });console.log(token);// Maven: com.auth0:java-jwt, org.bouncycastle:bcpkix-jdk18onimport com.auth0.jwt.JWT;import com.auth0.jwt.algorithms.Algorithm;import org.bouncycastle.util.io.pem.PemReader;
import java.io.FileReader;import java.security.KeyFactory;import java.security.interfaces.RSAPrivateKey;import java.security.spec.PKCS8EncodedKeySpec;import java.util.Date;import java.util.List;
PemReader pemReader = new PemReader(new FileReader("private_key.pem"));byte[] keyBytes = pemReader.readPemObject().getContent();pemReader.close();
RSAPrivateKey privateKey = (RSAPrivateKey) KeyFactory .getInstance("RSA") .generatePrivate(new PKCS8EncodedKeySpec(keyBytes));
Algorithm algorithm = Algorithm.RSA256(null, privateKey);
long now = System.currentTimeMillis();
String token = JWT.create() .withSubject("user_123") .withIssuer("partner-client-id") .withIssuedAt(new Date(now)) .withExpiresAt(new Date(now + 60_000)) .withClaim("name", "John Doe") .withClaim("email", "john@example.com") .withClaim("phoneNumber", "919999912345") .withClaim("cohorts", List.of("premium", "beta")) .sign(algorithm);
System.out.println(token);// go get github.com/golang-jwt/jwt/v5package main
import ( "crypto/x509" "encoding/pem" "fmt" "os" "time"
"github.com/golang-jwt/jwt/v5")
func main() { keyBytes, _ := os.ReadFile("private_key.pem") block, _ := pem.Decode(keyBytes) privateKey, _ := x509.ParsePKCS1PrivateKey(block.Bytes)
now := time.Now()
claims := jwt.MapClaims{ "sub": "user_123", "iss": "partner-client-id", "iat": now.Unix(), "exp": now.Add(60 * time.Second).Unix(), "name": "John Doe", "email": "john@example.com", "phoneNumber": "919999912345", "cohorts": []string{"premium", "beta"}, }
token := jwt.NewWithClaims(jwt.SigningMethodRS256, claims) signed, _ := token.SignedString(privateKey) fmt.Println(signed)}# gem install jwtrequire "jwt"
private_key = OpenSSL::PKey::RSA.new(File.read("private_key.pem"))
now = Time.now.to_i
payload = { sub: "user_123", iss: "partner-client-id", iat: now, exp: now + 60, name: "John Doe", email: "john@example.com", phoneNumber: "919999912345", cohorts: ["premium", "beta"]}
token = JWT.encode(payload, private_key, "RS256")puts token// Maven/Gradle: com.auth0:java-jwt, org.bouncycastle:bcpkix-jdk18onimport com.auth0.jwt.JWTimport com.auth0.jwt.algorithms.Algorithmimport org.bouncycastle.util.io.pem.PemReaderimport java.io.FileReaderimport java.security.KeyFactoryimport java.security.interfaces.RSAPrivateKeyimport java.security.spec.PKCS8EncodedKeySpecimport java.util.Date
val keyBytes = PemReader(FileReader("private_key.pem")).use { it.readPemObject().content }val privateKey = KeyFactory.getInstance("RSA") .generatePrivate(PKCS8EncodedKeySpec(keyBytes)) as RSAPrivateKey
val now = System.currentTimeMillis()
val token = JWT.create() .withSubject("user_123") .withIssuer("partner-client-id") .withIssuedAt(Date(now)) .withExpiresAt(Date(now + 60_000)) .withClaim("name", "John Doe") .withClaim("email", "john@example.com") .withClaim("phoneNumber", "919999912345") .withClaim("cohorts", listOf("premium", "beta")) .sign(Algorithm.RSA256(null, privateKey))
println(token)<?php// composer require firebase/php-jwtuse Firebase\JWT\JWT;
$privateKey = file_get_contents("private_key.pem");
$now = time();
$payload = [ "sub" => "user_123", "iss" => "partner-client-id", "iat" => $now, "exp" => $now + 60, "name" => "John Doe", "email" => "john@example.com", "phoneNumber" => "919999912345", "cohorts" => ["premium", "beta"],];
$token = JWT::encode($payload, $privateKey, "RS256");echo $token;// dotnet add package System.IdentityModel.Tokens.Jwtusing System.IdentityModel.Tokens.Jwt;using System.Security.Claims;using System.Security.Cryptography;using Microsoft.IdentityModel.Tokens;
using var rsa = RSA.Create();rsa.ImportFromPem(File.ReadAllText("private_key.pem"));
var credentials = new SigningCredentials( new RsaSecurityKey(rsa), SecurityAlgorithms.RsaSha256);
var now = DateTimeOffset.UtcNow;
var token = new JwtSecurityToken( issuer: "partner-client-id", claims: new[] { new Claim(JwtRegisteredClaimNames.Sub, "user_123"), new Claim(JwtRegisteredClaimNames.Iat, now.ToUnixTimeSeconds().ToString()), new Claim("name", "John Doe"), new Claim("email", "john@example.com"), new Claim("phoneNumber", "919999912345"), new Claim("cohorts", """["premium","beta"]"""), }, notBefore: now.UtcDateTime, expires: now.AddSeconds(60).UtcDateTime, signingCredentials: credentials);
var tokenString = new JwtSecurityTokenHandler().WriteToken(token);Console.WriteLine(tokenString);// swift-jwt: https://github.com/Kitura/Swift-JWTimport SwiftJWTimport Foundation
struct HubbleClaims: Claims { let sub: String let iss: String let iat: Date let exp: Date let phoneNumber: String let name: String? let email: String? let cohorts: [String]?}
let privateKeyURL = URL(fileURLWithPath: "private_key.pem")let privateKey = try Data(contentsOf: privateKeyURL)
let now = Date()let claims = HubbleClaims( sub: "user_123", iss: "partner-client-id", iat: now, exp: now.addingTimeInterval(60), phoneNumber: "919999912345", name: "John Doe", email: "john@example.com", cohorts: ["premium", "beta"])
var jwt = JWT(claims: claims)let token = try jwt.sign(using: .rs256(privateKey: privateKey))print(token)// dart pub add dart_jsonwebtokenimport 'dart:io';import 'package:dart_jsonwebtoken/dart_jsonwebtoken.dart';
void main() { final privateKeyPem = File('private_key.pem').readAsStringSync(); final privateKey = RSAPrivateKey(privateKeyPem);
final now = DateTime.now().millisecondsSinceEpoch ~/ 1000;
final jwt = JWT( { 'sub': 'user_123', 'iss': 'partner-client-id', 'iat': now, 'exp': now + 60, 'phoneNumber': '919999912345', 'name': 'John Doe', 'email': 'john@example.com', 'cohorts': ['premium', 'beta'], }, );
final token = jwt.sign(privateKey, algorithm: JWTAlgorithm.RS256); print(token);}Onboarding
- Generate an RSA key pair using the
opensslcommands above - Receive the
clientIdfrom Hubble via the Integration Portal to use as theissclaim in your tokens. - Submit the contents of
public_key.pemon the Integration Portal - Once configured, the partner can start issuing tokens immediately
Classic SSO (Legacy)
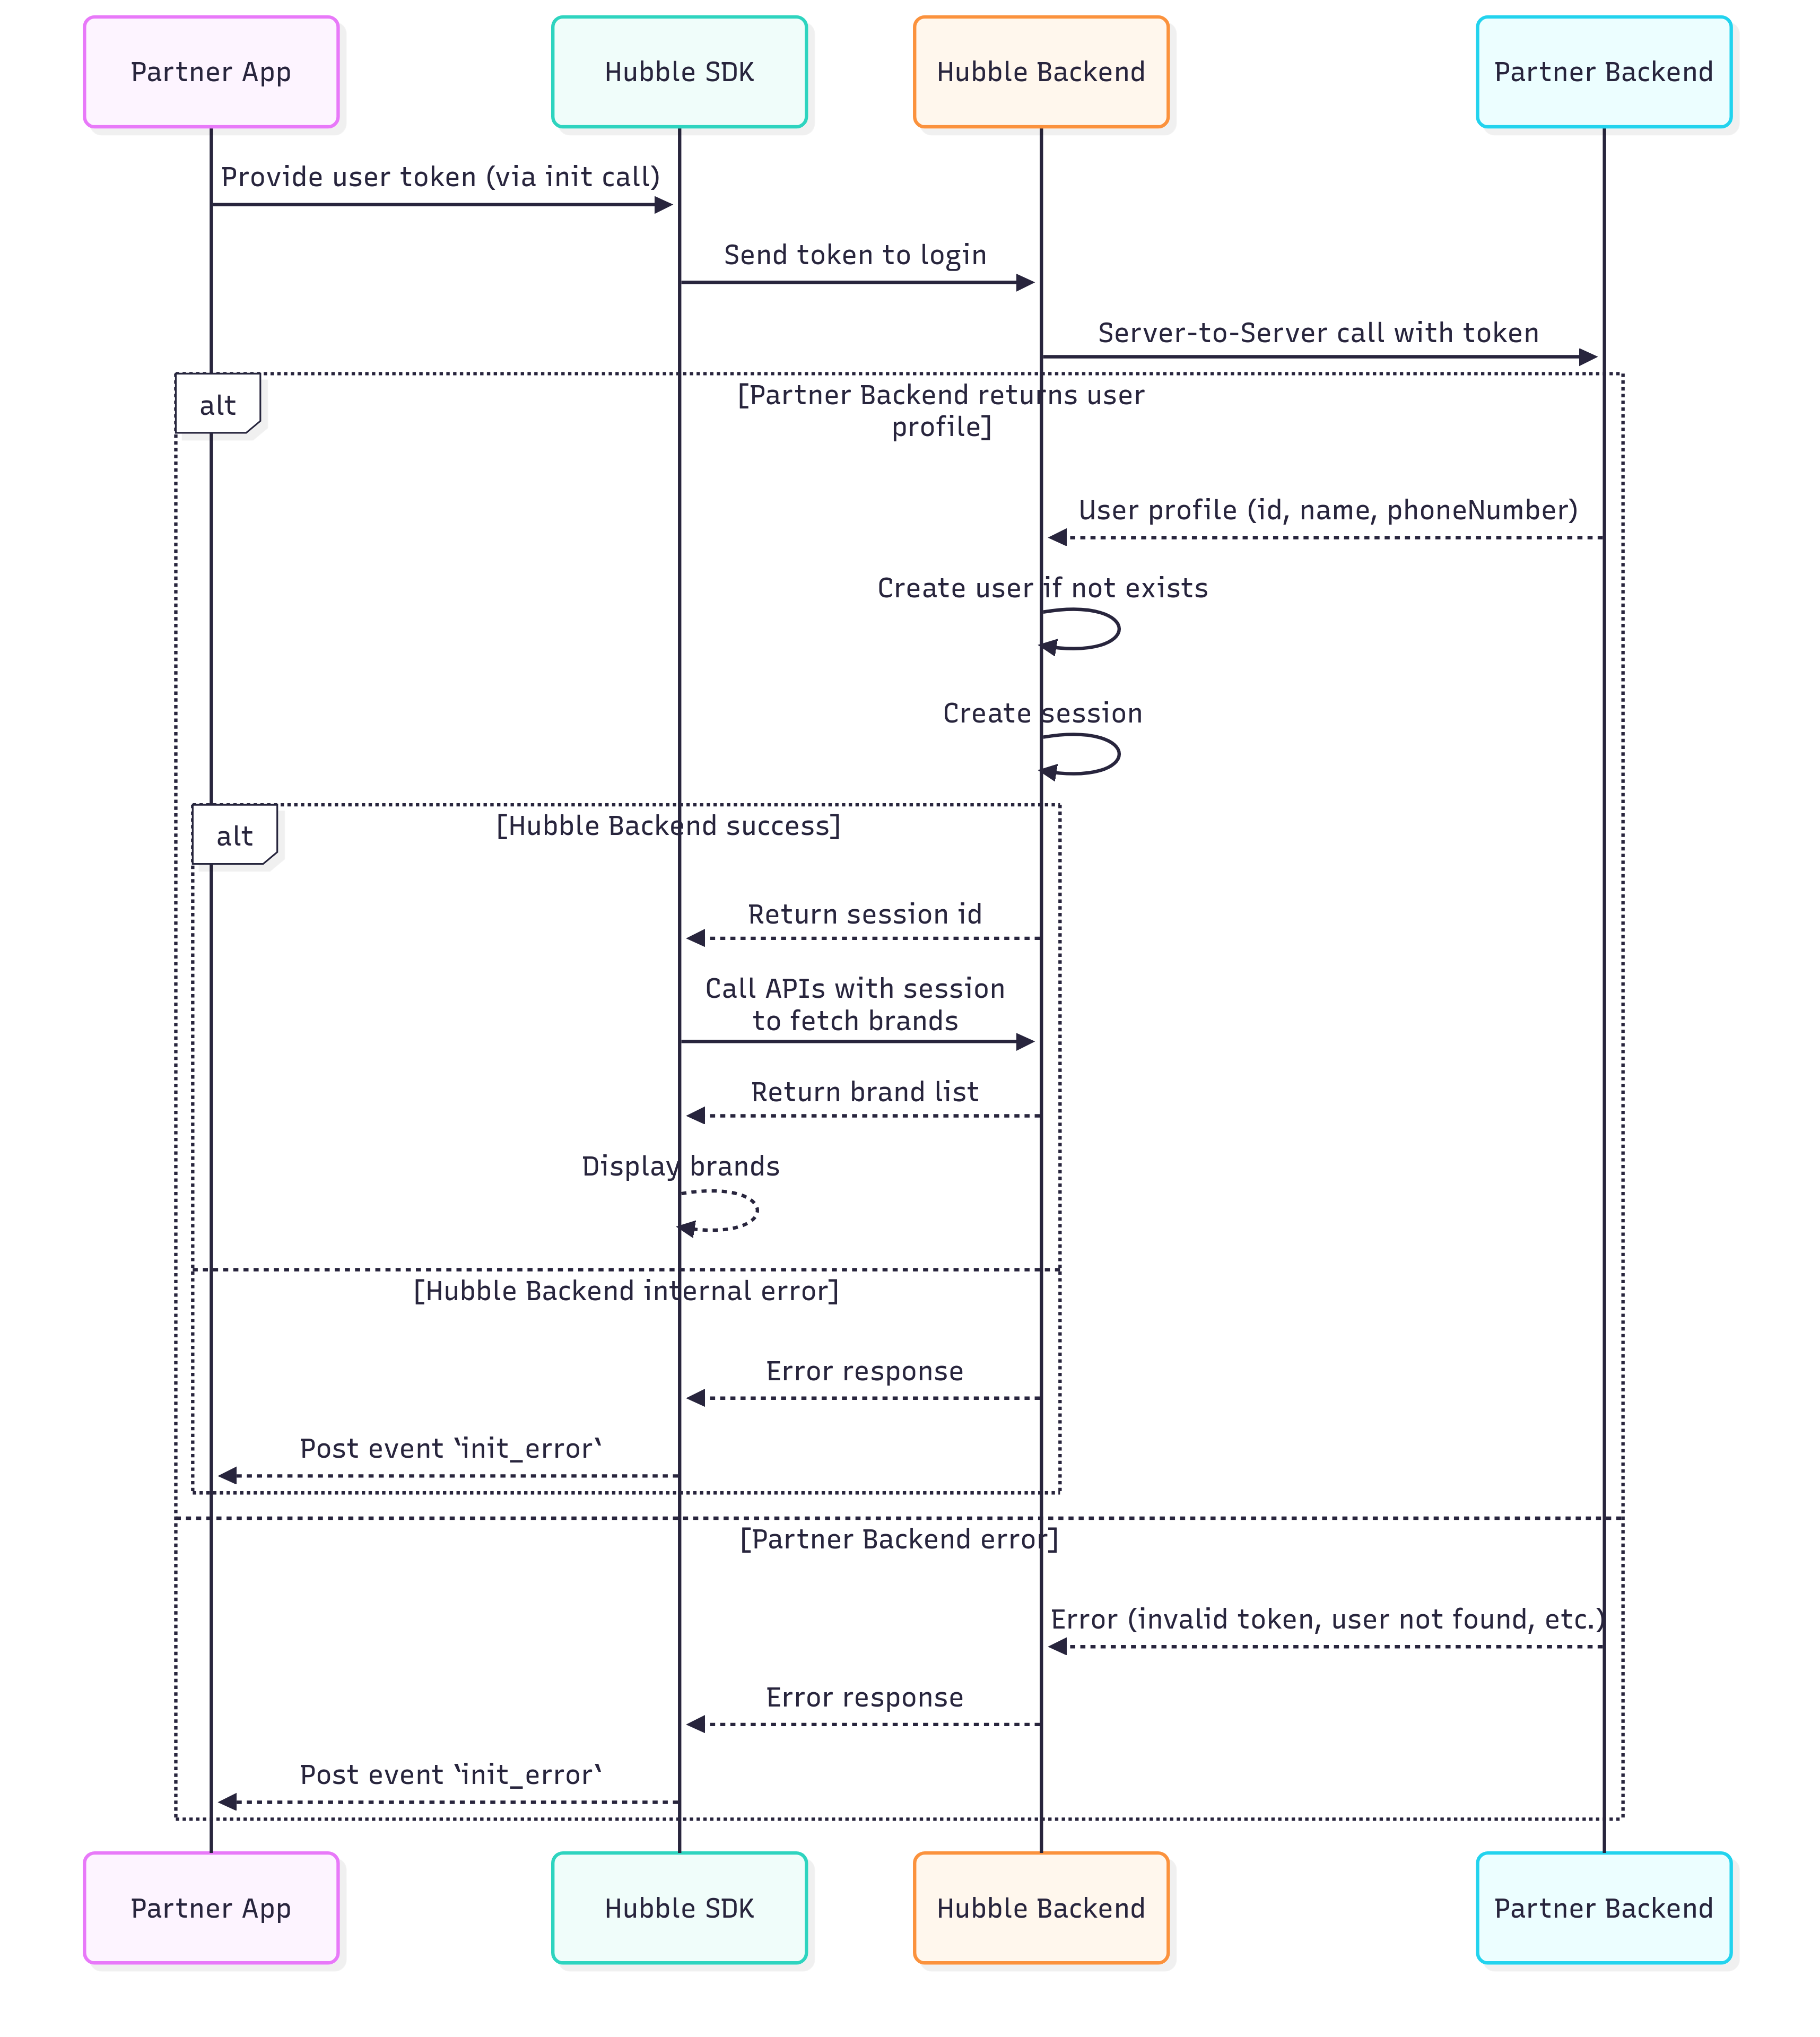
When Hubble’s SDK is invoked, we need to create a proxy user in our system. All our API calls would be happening against the session id we generate for this proxy user.
To create this proxy user, we require our partners to expose an API through which we can get user’s details.
Some of the mandatory user fields we require are
- User’s id
- Name
- Phone number
These are mandatory because we need to pass this to some of the services that power Hubble.
In the frontend, your application can pass to our SDK some code or token that uniquely identifies the user.
When the SDK is initialised,
- Our backend will get the token
- Make a call to the above requested API to get the user details
- Create user and session and return the session id for our SDK to start voucher workflows.
API Request/Response
Request
POST /ssoHeaders:
X-Hubble-Secret(string, required) — Pre-shared secret provided during onboarding
Body:
token(string, required) — SSO token generated by the partner system. Token validation logic is fully owned by the partner.
{ "token": "<your-token>"}Response (200 OK):
{ "userId": "test-user-123", "email": "testuser@example.com", "firstName": "Test", "lastName": "User", "phoneNumber": "1234567890", "cohorts": ["premium", "beta"]}Response Fields:
userId(string, nullable) — Partner’s unique user identifier. Must be present for a valid token.email(string, optional)firstName(string, optional)lastName(string, optional)phoneNumber(string, optional)cohorts(array of strings, optional) — Logical user groups used for segmentation, eligibility, or feature access.
Invalid Token Response (401 or 400):
If the token is invalid or expired, return:
{ "userId": null}Returning userId = null indicates authentication failure.
Example:
curl -X POST "https://partner-api.example.com/sso" \ -H "X-Hubble-Secret: your-secret-key" \ -H "Content-Type: application/json" \ --data '{"token": "sso-token"}'Note:
The partner is expected to implement this interface and share the base URL with our team. Our system will invoke the /sso API endpoint using the provided base URL.
Sequence Diagram